- Audio Converter Home
- Order Now!
- Get Technical Support
- Contact Sales
- See Screen Shots
- Browse Tutorial
|
Record screen sequences and broadcast screen video live! |
|
Audio recording power at your fingertips! |
Managing the Audio File List for Audio Format Conversion with Huelix Batch Audio Converter
Selecting Audio Files for batch Conversion, Removing Converted Files, and Resetting Conversion Status
Huelix Audio Converter is batch audio converter and provides a very flexible conversion process flow. This means that you can add a number of audio files to the application file list and decide later whether to convert them all to a particular format. You may also want to convert files into a number of formats (say, one set for archival and another for your portable audio player). It may also be desirable to convert files again and again to achieve the right mix of file size and audio quality.
To provide flexibility, files need to be checked to be converted. You can choose all files to be checked when they are added or unchecked by default. Pressing Ctrl+A while the mouse is on the list, will check all files. You can also access the same via the menu Edit | Select All (Alt+E+S). To uncheck all files, press Ctrl+U or the menu items Edit | Unselect All (Alt+E+U).
To further simplify and accelerate file selection, you can also invert selections. This means that all checked files will be unchecked and vice versa. As usual you can press the shortcut key Ctrl+I or use the menu Edit | Invert Selection (Alt+E+I). The screen shot below shows available options under the Edit menu. The checked files form the batch for the batch converter.
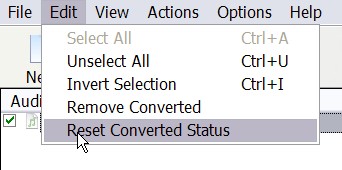
The menu item Remove Converted will remove all already converted files from the list. This is useful when you have a number of files to be converted, but you need to convert them into different formats. It is not necessary to remove files to disable conversion - simply unchecking them should suffice. Removal, however, reduces clutter when you have a large number of files.
Once a file is converted, it can not be converted again unless you change the export format (in which case the status is automatically reset to Idle ). In the rare event that you need to convert the files again, Reset Converted Status comes to the rescue. This can happen, for example, if you accidentally delete the converted files.
Operating on Selection of Sound Files
In addition to the operations possible on all files, you can also select files arbitrarily and operate on them. The usual Windows Explorer rules apply for selection. Clicking on an item in the list selects it. If you hold down the Ctrl key and click on files, you can select multiple files in different locations. Holding down Shift, will select all adjacent files starting from the first file selected.
Right clicking on the selection props up a context menu with the following operations:
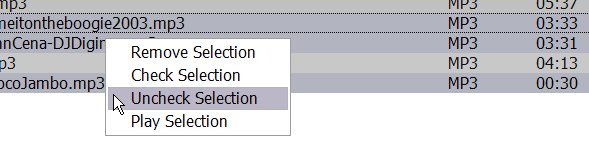
Remove Selection: This removes all selected files from the list. Note that this is the only way you can remove files from the list, because it is a rare operation.
Check Selection: All selected files will be checked for conversion.
Uncheck Selection: All selected files will be unchecked and thus excluded from conversion.
Play Selection: The selected files form a playlist and starts playing one after another. This option is available only if there are no other files playing. To stop playing, use the Actions | Stop menu item or the toolbar button Stop.
Sorting the File List
You can sort the list of files according to the list's headers. For example, to sort by filenames, simply click the list header "Audio File's Name". To sort by the compression or audio format type, click the header titled "Format". To sort by audio lengths, click the header "Duration". You can also sort by the status by clicking the header "Status". This is useful, for example, in grouping together all converted files.
Clicking again on the header will reverse the sort order. This means that if initially the durations were in the ascending order, the files will now be sorted in the descending order of their durations.
Note: Sorting is not available when a conversion is in progress.
The screen capture below shows how to sort by duration of audio files. Note that the duration tab is highlighted when the mouse is over it. Clicking on it will arrange files according to their lengths. Sorting by other headers is similar.

   See screen shots |
Huelix Audio Converter Home | Order Now | Download Free Trial | Get Technical Support | See Screen Shots | Huelix Solutions
Privacy Policy | Website Feedback
Copyright © Huelix Solutions Private Ltd, 2003-2008. All rights reserved.